This is the Escape The Labyrinth walkthrough for the Escape The Labyrinth level of the game Escape the Challenge by Voidkiller Studios. The level was also released as a standalone Flash game. The level can be played on Newgrounds, and the full game can be purchased from Itch.io.
Text walkthrough is followed by a video walkthrough…
* SPOILER ALERT *
Escape The Labyrinth Walkthrough:
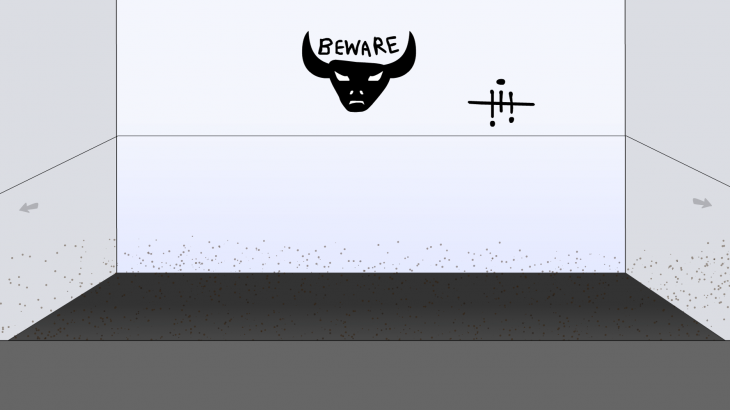
Notice the writing on the wall “make your own map”, you’re going to need a pen and paper to draw the map as you go in order to make things easier for you if you want to win. Also notice the “n” is underlined, and to the right side of the room there’s an E. These are direction as in “North” and “East”. Start out by going through the north door and notice the symbol next to the minotaur’s head in the next room. These are switch positions. You’ll need them later. Go right, straight, straight and you’ll reach the room with 3 switches. Raise the middle switch to open the door in the minotaur’s head’s room. Go back, turn left, and you’ll reach a room with a locked door and a blue switch. Raise it up to open the door, and it will lead you back to the room you first started in. If you go straight, you’ll reach a room with spikes that you can’t cross. Don’t go there. Instead, from the initial room, go north, turn left, and enter the door that you last unlocked, turn left, you’ll reach a wall with red switch and a spike symbol. Turn the switch down to disable the spikes. However, doing that will lock the door that you came through, so you’ll have to go back from a different path. From the red switch, turn right, go through the door to the next room, turn left and notice the red symbols on the wall. These are switch positions and you’ll need them to unlock a nearby room. Turn right twice, go through the first door, turn left, and notice the blue set of symbols on the wall. These are also switch positions that you’ll need. Turn right twice and take the map. You’ll now be able to see where you are on the map. Turn North and go to the next room. Turn left to the set of switches, and toggle the red and blue switches to the same up/down positions that you saw in the symbols in the nearby rooms. 1st red switch in top row should be down, 2nd should be up, and 1st red switch in the bottom row should be down, 2nd should be up. The blue switches in the top row should both be up. The 1st blue switch in the bottom row should be down, and 2nd blue switch in bottom row should be up. This will unlock the door behind you. Go through that unlocked door and notice the symbols on the wall “ADBEIAFDA”. These will unlock the next room. Turn south, go through the door, turn left, and go through the door to reach the next room. Press the pressure plates in the order that you just saw: A,D,B,E,I,A,F,D,A then press the switch. The door will open. Go through to the next room, turn left and notice the moving blades. Turn back right, go through the door, turn right to point south, and go through 2 doors straight. You’ll reach a room with a black switch and a diagram. This is a toggle switch. The symbol in the middle of the diagram represents the blades that you just saw. The circle and triangle represent different doors. Unlocking one will lock the other, and vice versa. Turn the switch down to unlock the door of the Northern room, turn around to point North, and go through 3 doors to reach the Northern room. Turn left, and push down the red switch to disable the moving blades in the next room. Turn left, and go back down to the Southern room and the toggle switch. Turn the toggle switch up to unlock the 2nd door in the blades room. Turn around to point North, go straight through 2 doors, turn left, go through the door, turn right, go through the door of the blades room, turn left, go through the door and notice the writing on the wall, this is the exit room, turn right to face the exit, and notice the exit door, you’ll need a key. There’s a room that you still haven’t been to. This room is the one on the bottom left corner of the map, the one that was blocked by spikes. Go to it (turn right, go through, turn right, go through, turn left, go through, turn right, go through, turn right, go through, turn left, go through, turn right, go straight 3 times). Once you reach the bottom left room, you’ll find a key, take it, go back to the exit room (middle room in top row) and use the key to unlock the exit door and escape the labyrinth!
Below is a detailed map of the labyrinth. The dashes on the walls represent doors, if they have an arrow it means they’re a 1-way door. The locks represent locked/lockable doors. The small rectangles represent switches and the letter near them shows what they unlock. The “i” symbols means a hint or code symbol.

Here’s the Escape The Labyrinth video walkthrough:
Here’s a screenshot of the game:
